


A highly effective strategy for acquiring essential materials in DragonSword: Awakening, including the coveted Fragments of Sacred Light, involves strategically engaging with Sudden Missions. Successfully completing these dynamic encounters can significantly accelerate the process of maximizing your primary character teams. However, locating these missions presents a distinct challenge, as they are only discoverable on the in-game map after direct engagement. This comprehensive guide details the locations of all Sudden Missions within DragonSword: Awakening, offering a tactical advantage to players seeking to optimize their progression.
Unveiling the Strategic Importance of Sudden Missions
Sudden Missions in DragonSword: Awakening serve as a crucial element of the game’s progression system. These aren’t static quests but rather dynamic events that appear throughout the game world, often requiring players to venture into specific zones or even hidden areas. Their primary function is to provide players with valuable resources, including character experience, currency, and specialized crafting or enhancement materials. The game’s developers, in an effort to encourage exploration and active gameplay, designed these missions to be somewhat elusive, rewarding diligent players with accelerated growth. The reset timer, set at 9 AM local time, ensures a consistent cycle of opportunities, allowing for daily strategic planning. With a total of 39 unique Sudden Missions to conquer, each with its own target and potential rewards, players are presented with a consistent stream of objectives. Many of these missions are embedded within cave systems or necessitate access to underground areas, adding a layer of environmental puzzle-solving to the bounty hunting. Failure to encounter a bounty notice when approaching a known location can often be attributed to these hidden environmental requirements, underscoring the importance of thorough exploration.
Targeting Fragments of Sacred Light: The Cornerstone of Character Advancement
The acquisition of Fragments of Sacred Light is paramount for players aiming to reach the pinnacle of their character development. These precious fragments are instrumental in the final stages of character leveling and awakening, enabling players to unlock powerful new abilities and statistical enhancements. A total of eight distinct Sudden Missions are dedicated to dispensing these vital fragments, collectively offering an impressive 420 Fragments of Sacred Light upon completion. These missions include: "Defeat Spark Droplet Murto," "Defeat Bargon, Wings of the Wild," "Defeat Aela, Wings of Ruin," "Defeat Autophagist Gult," "Defeat Sand Claw Dragus," "Defeat Acidic Slime Drazel," "Defeat Sticky Slime Frunk," and "Defeat Earth-Splitting Cragmo."
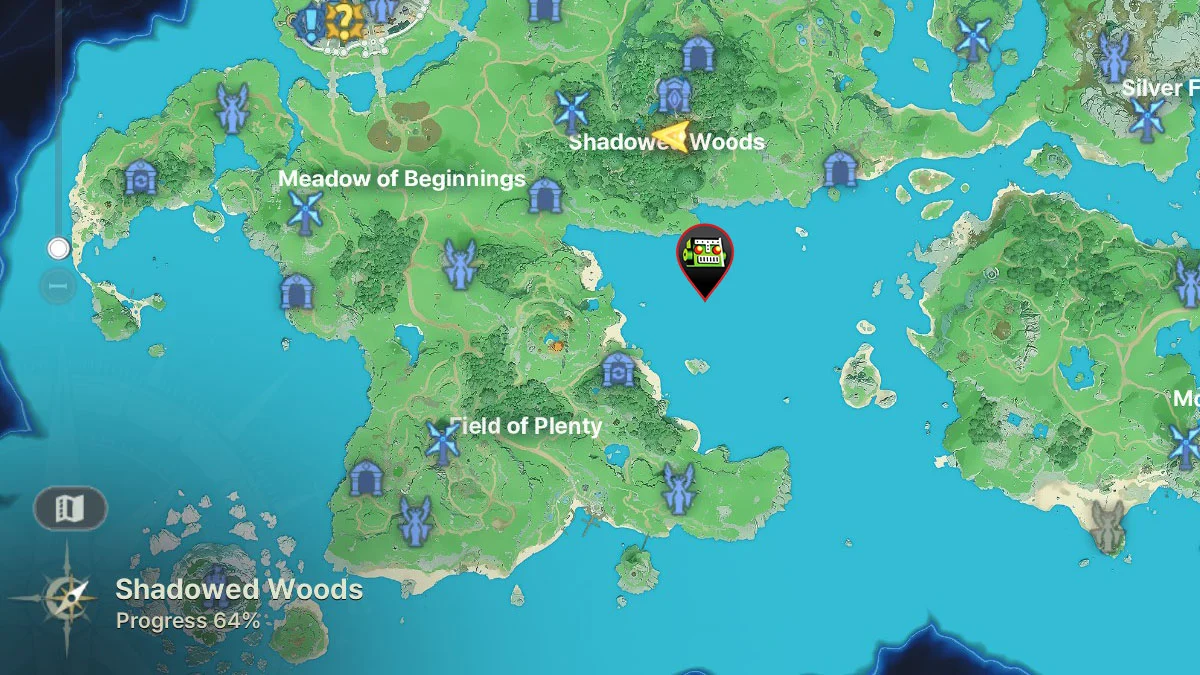
Among these fragment-yielding missions, the encounter with Spark Droplet Murto is noted for its particular elusiveness. To initiate this bounty, players must navigate to its designated location within the Shadowed Woods and then proceed to find a hidden path behind a waterfall. This environmental quirk serves as a deliberate obstacle, testing players’ observational skills and encouraging them to look beyond the obvious. The strategic importance of these fragments cannot be overstated; they are a bottleneck for high-level progression, and mastering their acquisition through these missions is a key differentiator for competitive players.

Shape Grinders: Refining Equipment for Optimal Performance
The efficacy of a player’s team in DragonSword: Awakening is heavily influenced by the quality of their equipment. Shape Grinders are essential consumables that allow players to reroll the affixes and stats on their gear, providing a pathway to optimizing their equipment for specific character builds. Nine Sudden Missions are specifically designed to reward players with these valuable reroll tokens. The Ruined Temple region emerges as a particularly rich hunting ground, hosting four of these missions: "Soulwarden Zelmoor," "Void Twilight Noor," "Faint Veil Sher," and "Grak the Bloodmaw."
Upon successfully obtaining Shape Grinders, players can utilize them within the "Reforge" menu, accessible from the hero’s screen. This process allows for the targeted improvement of equipment, enabling players to fine-tune their stats for maximum impact. It is important to note that the reforge mechanic is exclusively available for equipment that has already reached its maximum level, reinforcing the game’s tiered progression system. The ability to customize gear through rerolling adds a significant layer of depth to character building, allowing for highly specialized and potent loadouts.
Forging Molds: Crafting the Next Generation of Gear
While Shape Grinders focus on refining existing equipment, Forging Molds are crucial for the creation of new, high-tier gear. The supply of these molds through Sudden Missions is more limited, with only two missions directly contributing to their acquisition: "Defeat Piercing Zektar" and "Defeat Blood-Red Commander Bespina." This scarcity highlights the value of these particular bounties.
Players also have an alternative method for obtaining Forging Molds: by exchanging Adventurer’s Emblems at the in-game Exchange Shop. This provides a consistent, albeit resource-intensive, avenue for acquiring these vital crafting components, even if the Sudden Missions are not readily available or successfully completed. The interplay between direct acquisition through missions and indirect acquisition through currency exchange offers a balanced approach to resource management, catering to different player playstyles.
The Ever-Present Need for Gold: Funding Your Ventures

Gold remains a fundamental currency in DragonSword: Awakening, essential for a myriad of in-game activities, from purchasing basic supplies to upgrading equipment and skills. While the Eroded Underground Cemetery Currency Dungeon is recognized as a more lucrative source of both gold and experience in the late game, ten specific Sudden Missions offer a supplementary income of 50,000 gold each. These missions, while not yielding the astronomical sums of dedicated dungeons, provide a consistent and accessible stream of gold, particularly valuable during the earlier and mid-game stages of progression. Their widespread availability across various zones makes them an easy addition to any player’s daily routine, contributing to the overall financial stability of their adventuring endeavors.
Tomes of Insight: Accelerating Skill and Knowledge Acquisition
Tomes of Insight are instrumental in leveling up character skills and unlocking new passive abilities. Nine Sudden Missions are designated to reward players with these valuable tomes, with each mission yielding three tomes upon completion, totaling 27 tomes. While this amount contributes to a player’s skill progression, it is important to contextualize this within the broader game economy. Players can acquire a significantly larger quantity of Tomes of Insight by challenging the Dragon Worshipper Ruins (Tier 3), which offers approximately 100 tomes per run. This comparison underscores the role of Sudden Missions as supplementary boosters rather than primary farming methods for this particular resource. Nevertheless, for players who may not yet have access to the higher tiers of the Dragon Worshipper Ruins or who prefer a more diversified approach to resource gathering, these Sudden Missions remain a valuable source of skill enhancement materials.
Anonymous Artisan’s Crafting Tool: Empowering Rune Imbuement
The Anonymous Artisan’s Crafting Tool is a specialized item that facilitates the imbuement of runes into equipment. Runes provide powerful, often unique, stat bonuses and effects that can drastically alter a character’s capabilities. Currently, only one Sudden Mission directly rewards players with this crucial tool: "Defeat Braheim, the Heretic Guide," located in the Dragonrise Basin region.
The singular nature of this mission highlights the significant value of the Anonymous Artisan’s Crafting Tool. Its scarcity emphasizes the importance of successfully completing this specific bounty. For players looking to delve deeper into the rune system and unlock its full potential, securing this tool is a high priority. The game’s developers have provided extensive resources on the rune system, including a detailed guide to all rune types and unlocking methods, indicating a strategic design to encourage players to engage with this advanced customization feature. The limited availability of the tool through missions suggests that players may also need to explore other in-game avenues or wait for future updates that might introduce additional sources for this crafting component.
The Elusive Undiscarded Erat: A Hidden Challenge and a Unique Reward

The "Defeat Undiscarded Erat" Sudden Mission stands out as the most challenging and geographically obscure bounty within DragonSword: Awakening. Reaching this formidable foe requires a significant detour and a keen understanding of the game’s hidden mechanics. The Undiscarded Erat resides underwater, accessible by venturing from the shores of either Shadowed Forest or Firefly Forest. Players must then locate a specific crevice in the seabed at a marked spot, representing a significant deviation from typical overland questing. Descending further into this underwater passage will not only lead to the encounter with the Undiscarded Erat but also to the discovery of Kalien’s secret outfit, a highly sought-after cosmetic item.
Upon defeating the Undiscarded Erat, players are rewarded with the standard 300 experience points, alongside a significant cache of high-tier currency: 20 Crystals of Remembrance, 20 Crystals of Recollection, 20 Crystals of Reverie, and 20 Crystals of Oblivion. These crystals are likely tied to advanced progression systems or special event currency, further underscoring the unique nature and value of this hidden mission. The effort required to uncover and complete this bounty is commensurate with the potent rewards it offers, making it a true test of a player’s dedication and exploration prowess.
Strategic Implications and Player Engagement
The meticulous design of DragonSword: Awakening‘s Sudden Missions reflects a strategic approach to player engagement and progression. By scattering valuable resources across a variety of dynamic encounters, the game encourages consistent activity and exploration. The varied difficulty and accessibility of these missions cater to a broad player base, from casual adventurers seeking supplementary rewards to dedicated players optimizing their resource acquisition.
The introduction of hidden mechanics, such as the waterfall for Murto or the underwater crevice for Undiscarded Erat, adds an element of discovery and rewards those who invest time in understanding the game’s world. This not only enhances player retention but also fosters a sense of community as players share information and strategies for locating these elusive bounties.
The game’s developers appear to be actively curating the player experience by ensuring a steady flow of essential materials through these missions. This balanced approach prevents any single resource from becoming excessively scarce, thereby maintaining a healthy progression curve. As players master the locations and strategies for tackling these Sudden Missions, they are better equipped to maximize their characters’ potential. This, in turn, contributes to a more satisfying and rewarding gameplay loop, encouraging continued investment in the world of DragonSword: Awakening. Players are further advised to integrate their newfound resources with optimal character builds and team compositions, a topic extensively covered in dedicated guides, to ensure they are leveraging their gains to their fullest extent.